Replicated Quick Start
This topic provides a quick start workflow to help new users learn about the Replicated Platform. Complete this quick start before you onboard your application to the platform.
Introduction
This quick start demonstrates how to create, install, and update releases for a sample Helm chart in the Replicated Platform. You will repeat these same basic steps to create and test releases throughout the onboarding process to integrate Replicated features with your own application.
The goals of this quick start are to introduce new Replicated users to the following common tasks for the purpose of preparing to onboard to the Replicated Platform:
-
Adding the Replicated SDK to a Helm chart as a dependency
-
Working with applications, channels, releases, and customers in the Replicated Platform
-
Working with the Replicated CLI
-
Installing and updating applications on a VM with Replicated Embedded Cluster through the Replicated Admin Console UI.
Replicated recommends that you allow one to two hours to complete this quick start. No prior knowledge of Replicated, Helm, or interacting with the command line is required. However, if you are unfamiliar with these tools, you might allow more time. If you have any questions or need help, don't hesitate to reach out to our team at https://www.replicated.com/contact.
Set Up Your Environment
Before you begin, do the following to see up your environment:
-
Install the Helm CLI, which is the tool for interacting with Helm and managing Helm charts. See Install Helm.
-
Ensure that you have access to a VM that meets the requirements for Embedded Cluster:
-
Option 1: Use Compatibility Matrix. To use Replicated Compatibility Matrix to create a VM, do the following before proceeding:
-
Request Compatibility Matrix credits. You can request credits by creating a Vendor Portal account and then going to Compatibility Matrix > Request more credits in the Vendor Portal. For more information about creating an account, see Create a Vendor Account. For more information about Compatibility Matrix credits, see Billing and Credits.
noteIf you are new to the Replicated platform, you might be eligible for $100 in free Compatibility Matrix credits. To request your free credits, reach out to our sales team at https://www.replicated.com/contact and note in the comments that you are completing the Replicated Quick Start.
-
Ensure that you have an SSH key in your GitHub account. Then, add your GitHub username to your Vendor Portal Account Settings. This will provide SSH access to VMs that you create with Compatibility Matrix. For more information, see Set Up SSH Access in Create VMs.
After you complete the prerequisites above, continue to the Quick Start. You will create the VM with Compatibility Matrix as part of the tutorial.
-
-
Option 2: Bring your own VM. Your VM must meet these requirements:
- Firewalls must allow HTTP and HTTPS traffic.
-
Linux operating system
-
x86-64 architecture
-
systemd
-
At least 2GB of memory and 2 CPU cores
-
The disk on the host must have a maximum P99 write latency of 10 ms. This supports etcd performance and stability. For more information about the disk write latency requirements for etcd, see Disks in Hardware recommendations and What does the etcd warning “failed to send out heartbeat on time” mean? in the etcd documentation.
-
The data directory used by Embedded Cluster must have 40Gi or more of total space and be less than 80% full. By default, the data directory is
/var/lib/embedded-cluster. The directory can be changed by passing the--data-dirflag with the Embedded Clusterinstallcommand. For more information, see install.Note that in addition to the primary data directory, Embedded Cluster creates directories and files in the following locations:
/etc/cni/etc/k0s/opt/cni/opt/containerd/run/calico/run/containerd/run/k0s/sys/fs/cgroup/kubepods/sys/fs/cgroup/system.slice/containerd.service/sys/fs/cgroup/system.slice/k0scontroller.service/usr/libexec/k0s/var/lib/calico/var/lib/cni/var/lib/containers/var/lib/kubelet/var/log/calico/var/log/containers/var/log/embedded-cluster/var/log/pods/usr/local/bin/k0s
-
(Online installations only) Access to replicated.app and proxy.replicated.com or your custom domain for each
-
Embedded Cluster is based on k0s, so all k0s system requirements and external runtime dependencies apply. See System requirements and External runtime dependencies in the k0s documentation.
For more information, see Set Up Development Environments for Testing.
-
Quick Start
-
If you have not done so already, create an account in the Vendor Portal. You can either create a new team or join an existing team. For more information, see Create a Vendor Account.
-
Create an application using the Replicated CLI:
-
On your local machine, install the Replicated CLI:
-
MacOS
brew install replicatedhq/replicated/cli -
Linux / Windows Subsystem for Linux (WSL)
version=$(curl -s https://api.github.com/repos/replicatedhq/replicated/releases/latest \
  | grep -m1 -Po '"tag_name":\s*"v\K[^"]+')
curl -Ls \
  "https://github.com/replicatedhq/replicated/releases/download/v${version}/replicated_${version}_linux_amd64.tar.gz" \
  -o replicated.tar.gz
tar xf replicated.tar.gz replicated && rm replicated.tar.gz
mv replicated /usr/local/bin/replicated
For more information and additional installation options, see Install the Replicated CLI.
-
-
Authorize the Replicated CLI:
replicated loginIn the browser window that opens, follow the prompt to log in to your Vendor Portal account and authorize the CLI.
-
Create an application named
SlackerNews:replicated app create SlackerNews -
Set the
REPLICATED_APPenvironment variable to the application that you created:export REPLICATED_APP=APP_SLUGWhere
APP_SLUGis the unique application slug provided in the output of theapp createcommand.Setting the
REPLICATED_APPenvironment variable allows you to interact with the application using the Replicated CLI without needing to use the--appflag with every command.
-
-
Get the sample SlackerNews Helm chart:
-
Run the following command to download version 1.0.0 of the sample SlackerNews Helm chart to a new
quick-startdirectory:curl -O --create-dirs --output-dir quick-start https://docs.replicated.com/slackernews-1.0.0.tar.gz -
Untar the chart:
tar -xzf quick-start/slackernews-1.0.0.tar.gz -C quick-start/ && rm quick-start/slackernews-1.0.0.tar.gz -
Change to the
slackernewschart directory:cd quick-start/chart/slackernews -
List the files in the
slackernewsdirectory to view the contents of the Helm chart:lsChart.lock Chart.yaml NOTES.txt README.md templates values.yaml -
In the SlackerNews Helm chart
Chart.yaml, add the Replicated SDK as a dependency:# Chart.yaml
dependencies:
- name: replicated
repository: oci://registry.replicated.com/library
version: 1.7.2For the latest version information for the Replicated SDK, see the replicated-sdk repository in GitHub.
The Replicated SDK is a Helm chart that provides access to Replicated features and can be installed as a small service alongside your application. For more information, see About the Replicated SDK.
-
Update dependencies and package the Helm chart to a
.tgzchart archive:helm package --dependency-update .Where
--dependency-update(or-u) is an option for thehelm packagecommand that updates chart dependencies before packaging. For more information, see Helm Package in the Helm documentation.The output of this command is a file named
slackernews-1.0.0.tgz.
-
-
Add the
slackernews-1.0.0.tgzchart archive to a release in the Replicated Platform:-
Change to the
quick-startdirectory:cd ../.. -
In the
quick-startdirectory, create a directory namedmanifests:mkdir manifestsYou will add the files required to support installation with Embedded Cluster to this subdirectory.
-
Move the
slackernews-1.0.0.tgzchart archive that you created tomanifests:mv chart/slackernews/slackernews-1.0.0.tgz manifests -
In
manifests, create the following YAML files:cd manifeststouch slackernews.yaml replicated-app.yaml k8s-app.yaml embedded-cluster.yaml config.yamlThese manifests will be used by Embedded Cluster to install SlackerNews.
-
In each of the files that you created, paste the corresponding YAML provided in the tabs below:
- slackernews.yaml
- replicated-app.yaml
- k8s-app.yaml
- embedded-cluster.yaml
- config.yaml
Description
The HelmChart custom resource provides instructions to the installer about how to deploy the Helm chart. The
nameandchartVersionlisted in the HelmChart custom resource must match the name and version of a Helm chart archive in the release. This HelmChart resource includes severalvaluesand conditionaloptionalValuesthat are supplied tohelm templateduring deployment.YAML
apiVersion: kots.io/v1beta2
kind: HelmChart
metadata:
  name: slackernews
spec:
  # chart identifies a matching chart from a .tgz
  chart:
    name: slackernews
    chartVersion: 1.0.0
  namespace: slackernews

  # values are used in the customer environment, as a pre-render step
  # these values will be supplied to helm template
  values:
    postgres:
      enabled: true
      deploy_postgres: repl{{ ConfigOption "deploy_postgres" | ParseBool }}
    slack:
      botToken: repl{{ ConfigOption "slack_bot_token" | quote }}
      userToken: repl{{ ConfigOption "slack_user_token" | quote }}
      clientId: repl{{ ConfigOption "slack_clientid" | quote }}
      clientSecret: repl{{ ConfigOption "slack_clientsecret" | quote }}
    slackernews:
      domain: repl{{ ConfigOption "slackernews_domain" }}
      adminUserEmails: repl{{ ConfigOption "slackernews_admin_user_emails" | quote }}
    admin-console:
      enabled: false
    replicated:
      isEmbeddedCluster: repl{{ eq Distribution "embedded-cluster"}}
      isKOTSManaged: true
      imagePullSecrets:
        - name: '{{repl ImagePullSecretName }}'
    service:
      tls:
        enabled: true
    nginx:
      enabled: true
    images:
      pullSecrets:
        - name: '{{repl ImagePullSecretName }}'

  optionalValues:
    # load images from the local registry in an air-gapped environment
    - when: '{{repl HasLocalRegistry }}'
      recursiveMerge: true
      values:
        replicated:
          isAirgap: true
          image:
            registry: '{{repl LocalRegistryHost }}'
            repository: '{{repl LocalRegistryNamespace }}/replicated-sdk-image'
        slackernews:
          registry: '{{repl LocalRegistryHost}}'
          repository: '{{LocalRegistryNamespace}}/slackernews-web'
        nginx:
          registry: '{{repl LocalRegistryHost}}'
          repository: '{{LocalRegistryNamespace}}/nginx'
        postgres:
          registry: '{{repl LocalRegistryHost}}'
          repository: '{{LocalRegistryNamespace}}/postgres'

    # the user wants us to deploy a local Postgres instance
    - when: '{{repl ConfigOptionEquals "deploy_postgres" "1"}}'
      recursiveMerge: true
      values:
        postgres:
          password: '{{repl ConfigOption "postgres_password" }}'

    # the user provided their own Postgres instance
    - when: '{{repl ConfigOptionEquals "deploy_postgres" "0"}}'
      recursiveMerge: true
      values:
        postgres:
          uri: '{{repl ConfigOption "postgres_external_uri" }}'

    # use the user-provided certificates
    - when: '{{repl ConfigOptionEquals "certificate_source" "upload_existing"}}'
      recursiveMerge: true
      values:
        service:
          tls:
            enabled: true
            cert: repl{{ ConfigOptionData "tls_cert" | nindent 14 }}
            key: repl{{ ConfigOptionData "tls_key" | nindent 14 }}
            ca: repl{{ ConfigOptionData "tls_ca" | nindent 14 }}

    # or generate our own
    - when: '{{repl ConfigOptionEquals "certificate_source" "generate_internal"}}'
      recursiveMerge: true
      values:
        service:
          tls:
            enabled: true
            ca: |-
              {{repl $ca := genCA (LicenseFieldValue "customerName") 365 }}
              {{repl $ca.Cert | Base64Encode}}
            cert: |-
              {{repl $cert := genSignedCert (ConfigOption "slackernews_domain") nil (list (ConfigOption "slackernews_domain")) 365 $ca }}
              {{repl $cert.Cert | nindent 14 }}
            key: |-
              {{repl $cert.Key | nindent 14 }}

    # handle different service types
    - when: '{{repl ConfigOptionEquals "service_type" "cluster_ip"}}'
      recursiveMerge: true
      values:
        nginx:
          service:
            type: ClusterIP

    - when: '{{repl ConfigOptionEquals "service_type" "load_balancer"}}'
      recursiveMerge: true
      values:
        nginx:
          service:
            type: LoadBalancer

    - when: '{{repl ConfigOptionEquals "service_type" "node_port"}}'
      recursiveMerge: true
      values:
        nginx:
          service:
            type: NodePort
            nodePort:
              port: repl{{ ConfigOption "node_port_port" }}


  # builder values provide a way to render the chart with all images
  # and manifests. this is used in Replicated to create airgap packages
  builder:
    postgres:
      password: this-is-not-used-but-needed-for-builder
      deploy_postgres: true
      enabled: true
Description
The Replicated Application custom resource enables features in the Replicated Admin Console UI, which is used to configure, install, update, and manage applications. This Application resource provides a name for the application to display in the Admin Console, adds custom status informers that are used to display the status of the deployment in the Admin Console dashboard, and adds a custom application icon.
YAML
apiVersion: kots.io/v1beta1
kind: Application
metadata:
  name: slackernews
  annotations:
    kots.io/exclude: "true"
spec:
  title: SlackerNews
  icon: "https://uploads-ssl.webflow.com/6310ad0e6a18aa1620da6ae8/6330e04f42bc6a7ba03b4725_snicon.png"
  statusInformers:
    - slackernews/deployment/slackernews
    - slackernews/deployment/slackernews-nginx
    - '{{repl if ConfigOptionEquals "deploy_postgres" "1"}}slackernews/statefulset/postgres{{repl end}}'
  additionalNamespaces:
    - slackernews
Description
The Kubernetes SIG Application custom resource supports functionality such as including buttons and links on the Admin Console dashboard. This SIG Application resource adds an Open SlackerNews button that opens the application.
YAML
apiVersion: app.k8s.io/v1beta1
kind: Application
metadata:
  name: "slackernews"
  annotations:
    kots.io/exclude: "true"
  labels:
    app.kubernetes.io/name: "slackernews"
    app.kubernetes.io/version: "0.0.1"
spec:
  selector:
    matchLabels:
     app.kubernetes.io/name: "slackernews"
  componentKinds:
    - group: core
      kind: Service
    - group: apps
      kind: Deployment
  descriptor:
    version: "1.0.0"
    description: "SlackerNews"
    icons:
      - src: "https://uploads-ssl.webflow.com/6310ad0e6a18aa1620da6ae8/6330e04f42bc6a7ba03b4725_snicon.png"
        type: "image/png"
    type: slackernews
    links:
      - description: 🔗 Open Slackernews
        url: 'https://{{repl ConfigOption "slackernews_domain" }}'
Description
To install your application with Embedded Cluster, an Embedded Cluster Config must be present in the release. At minimum, the Embedded Cluster Config sets the version of Embedded Cluster that will be installed. You can also define several characteristics about the cluster.
YAML
apiVersion: embeddedcluster.replicated.com/v1beta1
kind: Config
spec:
  version: 2.10.0+k8s-1.33
Description
The Config custom resource defines the application configuration fields that are exposed to the user in the Admin Console. These fields can then be mapped to the
values.yamlfile for the Helm chart. This Config resource includes several fields, but you will only use a few of them when installing SlackerNews for the purpose of this tutorial.YAML
apiVersion: kots.io/v1beta1
kind: Config
metadata:
  name: slackernews-config
spec:
  groups:
    - name: slackernews
      title: Application Core
      description: |
        For this section, you can specify some core parameters for how
        Slackernews operates, including the domain where users will access it
        and the user who can administer it.

        Users that you specify under **Admin Users** will be able to access the
        Slackernews adminstrative console at `/admin`, allowing them to manage
        content, users, and settings. Changes will take effect the next time
        they are active in the Slackernews application.
      items:
        - name: slackernews_domain
          title: Ingress Hostname
          help_text: >
            The domain name at which you'll access SlackerNews. Don't include
            the `https://` or any path elements.
          type: text
          required: true
          # validation:
          #   regex:
          #     pattern: ^(?!-)[A-Za-z0-9-]{1,63}(?<!-)(\.(?!-)[A-Za-z0-9-]{1,63}(?<!-))*\.[A-Za-z]{2,}$
          #     message: Please enter a valid hostname
        - name: slackernews_admin_user_emails
          title: Admin Users
          type: text
          help_text: >
            Provide a comma-separated list of email addresses for the users you
            want to grant admin access to.

    - name: ingress
      title: Application Access
      description: |
        You can customize how you will expose SlackerNews to the internet.
        Note that the domain you use will need to be publicly addressable with certs signed by a public authority
        so it can receive webhooks from Slack.

        Common configurations include:

        - **ClusterIP** Using a Cluster IP and configuring your existing ingress controller to route traffic to SlackerNews
        - **NodePort** Using a NodePort and configuring an existing load balancer to route traffic to SlackerNews
        - **LoadBalancer** Using a LoadBalancer service and letting Kubernetes provision a load balancer for you

        If you're running in a supported cloud provider and want Kubernetes to provision a Load Balancer, use LoadBalancer.
      items:
        - name: service_type
          title: Service Type
          type: select_one
          items:
            - name: node_port
              title: NodePort
            - name: cluster_ip
              title: ClusterIP
            - name: load_balancer
              title: LoadBalancer
          default: node_port
        - name: node_port_port
          title: Node Port
          help_text: >
              (Optional) - The port to use for the NodePort service type. Leave this blank to have Kubernetes choose a port for you.
          type: text
          default: "443"
          when: repl{{ ConfigOptionEquals "service_type" "node_port" }}

    - name: tls
      title: Certificates
      description: |
        You can secure the Slackernews application with certificates from a trusted certificate authority
        or we can generate them for you. We recommend that you upload your own certificates for production installations.
      items:
        - name: certificate_source
          type: select_one
          title: Certificate Source
          default: generate_internal
          items:
            - name: generate_internal
              title: Generate
            - name: upload_existing
              title: Upload
        - name: tls_cert
          title: Certificate
          type: file
          when: '{{repl ConfigOptionEquals "certificate_source" "upload_existing"}}'
        - name: tls_key
          title: Private Key
          type: file
          when: '{{repl ConfigOptionEquals "certificate_source" "upload_existing"}}'
        - name: tls_ca
          title: Signing Authority
          type: file
          when: '{{repl ConfigOptionEquals "certificate_source" "upload_existing"}}'

    - name: slack
      title: Slack Settings
      description: |
        If desired, you can preconfigure the slack settings for SlackerNews.
        These are required for logging into SlackerNews and pulling/organizing content from your slack instance.
        If you don't preconfigure these settings, you'll be prompted to configure them when you first access SlackerNews.

        Instructions on how to configure your slack application and collect these values can be found in [the SlackerNews slack documentation](https://docs.slackernews.io/slack/).
      items:
        - name: slack_clientid
          title: Slack Client ID
          type: text
        - name: slack_clientsecret
          title: Slack Client Secret
          type: password
        - name: slack_user_token
          title: User OAuth Token
          type: password
          validation:
            regex:
              pattern: ^xoxp-.*$
              message: Please enter the Slack user token for your instance of Slackernews
        - name: slack_bot_token
          title: Bot User OAuth Token
          type: password
          validation:
            regex:
              pattern: ^xoxb-.*$
              message: Please enter the Slack bot token for your instance of Slackernews

    - name: postgres
      description: >
        This section can be used to configure the postgresql database required by SlackerNews. You
        can either deploy postgresql as part of the installation or provide an external URI to an existing postgresql instance
        that you will use for SlackerNews.
      title: Postgresql
      items:
        - name: deploy_postgres
          type: bool
          title: Deploy Postgresql Database
          default: "1"
        - name: postgres_password
          type: password
          title: Postgresql Password
          required: true
          hidden: true
          when: repl{{ ConfigOptionEquals "deploy_postgres" "1"}}
          value: repl{{ RandomString 40}}
        - name: postgres_external_uri
          type: text
          title: Postgresql URI
          required: true
when: repl{{ ConfigOptionEquals "deploy_postgres" "0"}} -
Lint the YAML files in the
manifestsdirectory:replicated release lint --yaml-dir .Example output:
RULE                                TYPE   FILENAME             LINE   MESSAGE
may-contain-secrets                 info   slackernews.yaml     142    It looks like there might be secrets in this file
preflight-spec                      warn                               Missing preflight spec
troubleshoot-spec                   warn                               Missing troubleshoot spec
nonexistent-status-informer-object  warn   replicated-app.yaml  14     Status informer points to a nonexistent kubernetes object. If this is a Helm resource, this warning can be ignored.
nonexistent-status-informer-object  warn   replicated-app.yaml  15     Status informer points to a nonexistent kubernetes object. If this is a Helm resource, this warning can be ignored.
nonexistent-status-informer-object warn replicated-app.yaml 16 Status informer points to a nonexistent kubernetes object. If this is a Helm resource, this warning can be ignored.noteYou can ignore
infoorwarnmessages for the purpose of this quick start. -
From the
manifestsdirectory, create a release and promote it to the Unstable channel:replicated release create --yaml-dir . --promote UnstableExample output:
  • Reading manifests from . ✓
  • Creating Release ✓
    • SEQUENCE: 1
  • Promoting ✓
    • Channel 2kvjwEj4uBaCMoTigW5xty1iiw6 successfully set to release 1
-
-
Create a test customer so that you can install the release in your VM with Embedded Cluster:
-
Log in to the Vendor Portal.
-
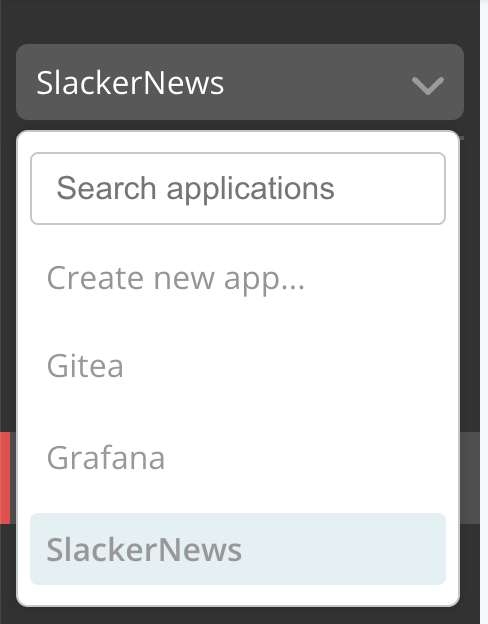
Under the application drop down, select the SlackerNews application that you created.
-
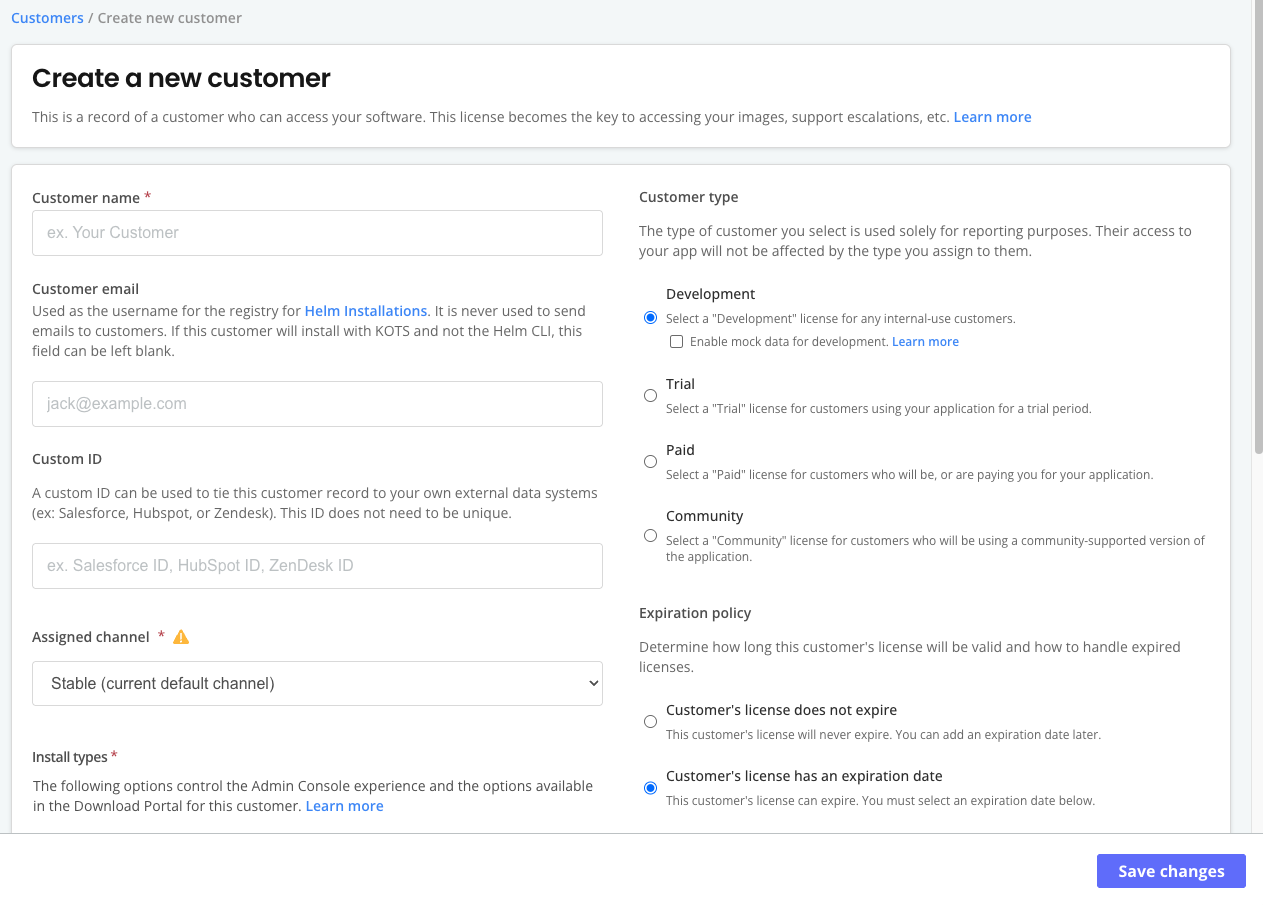
Click Customers > Create customer.
The Create a new customer page opens:
-
For Customer name, enter a name for the customer. For example,
Example Customer. -
For Assigned Channel, select Unstable. This allows the customer to install releases promoted to the Unstable channel.
-
For Customer type, select Development.
-
For Install types, enable Embedded Cluster (current generation product) and disable the other install type options.
-
Click Save Changes.
-
-
(Optional) In the Vendor Portal, click Releases to view the release that you promoted. In the release viewer, you can see the Replicated manifests as well as the SlackerNews
Chart.yamlandvalues.yamlfiles. -
If you brought your own VM, SSH onto your VM. Otherwise, follow these steps to create and SSH onto a VM with Compatibility Matrix:
-
Create an Ubuntu VM that expires after two hours:
replicated vm create --distribution ubuntu --version 24.04 --instance-type r1.small --disk 50 --ttl 2hExample output:
ID        NAME             DISTRIBUTION  VERSION  STATUS  NETWORK   CREATED               EXPIRES   COST
97940819 practical_black ubuntu 24.04 queued c726ffff 2025-08-20 14:32 MDT - $0.69 -
After a few minutes, check the status of the VM to see when it is
running:replicated vm lsExample output:
ID        NAME             DISTRIBUTION  VERSION  STATUS   NETWORK   CREATED               EXPIRES                COST
97940819 practical_black ubuntu 24.04 running c726ffff 2025-08-20 14:32 MDT 2025-08-20 16:33 MDT $0.69 -
Run the following command to use the Compatibility Matrix Forwarder to SSH onto the VM:
ssh VM_ID@replicatedvm.comWhere
VM_IDis theIDfrom the output of thereplicated vm lscommand.noteIf you are prompted to add the fingerprint for replicatedvm.com, type
yesand press Enter. -
When prompted, provide the passphrase for the SSH key in your linked GitHub account. Compatibility Matrix uses GitHub SSH to provide access to the VM.
-
-
Install the application with Embedded Cluster:
-
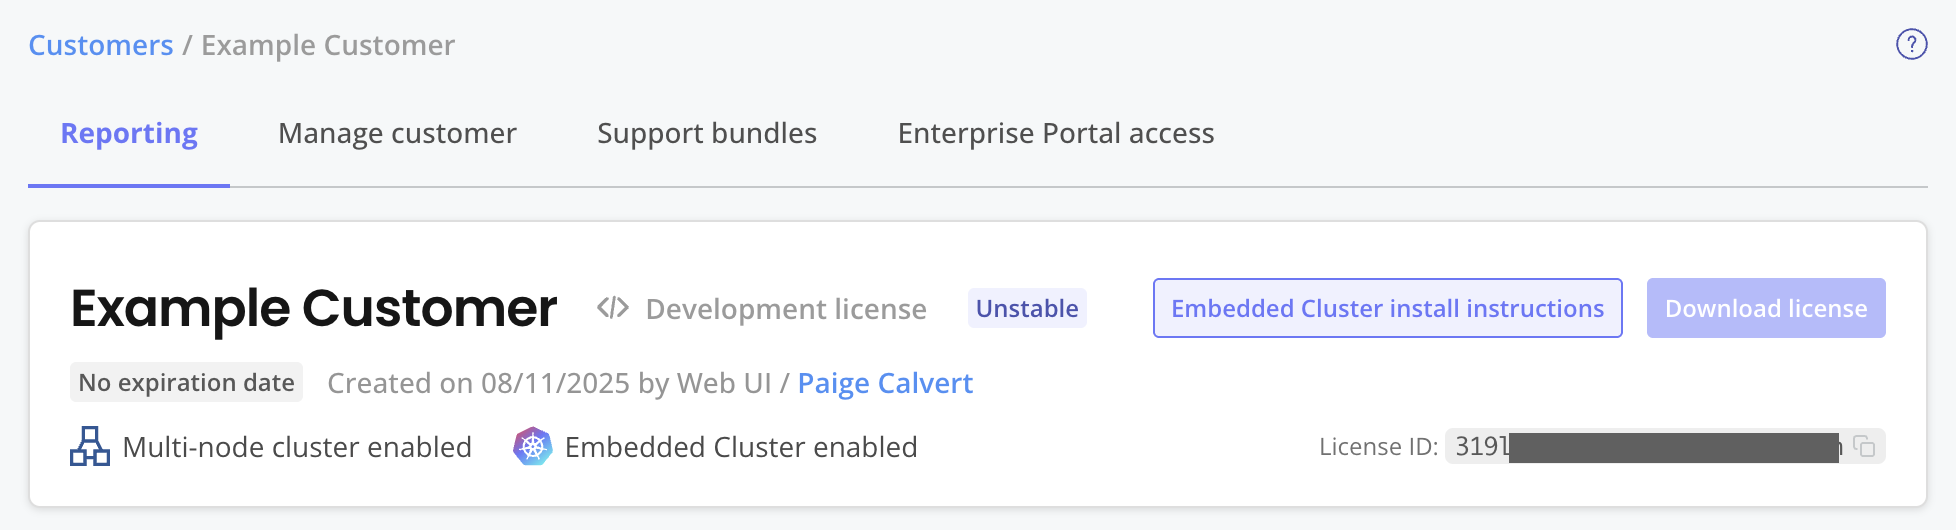
In the Vendor Portal, on the page for the customer that you created, click Embedded Cluster install instructions.
-
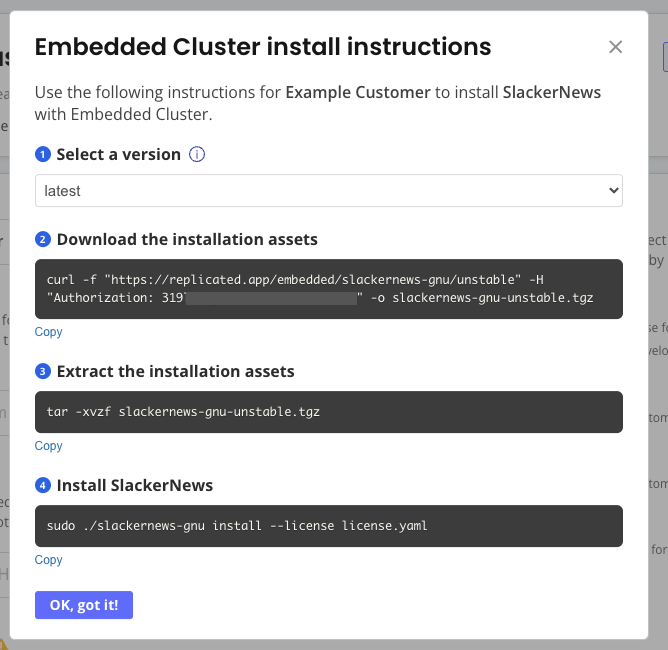
On your VM, run the commands in the Embedded cluster install instructions dialog to download the latest release, extract the installation assets, and install SlackerNews.
-
When prompted by the
installcommand, set a password for accessing the Admin Console.noteRemember this password because you will use it to log in to the Admin Console in a later step.
The installation command takes a few minutes to complete.
Example output:
? Set the Admin Console password (minimum 6 characters): ********
? Confirm the Admin Console password: ********

✔  Initialization complete
✔  Host preflights passed
✔  Node is ready
✔  Storage is ready
✔  Runtime Operator is ready
✔  Admin Console is ready
✔  Additional components are ready

-----------------------------------------------------------------
Visit the Admin Console to configure and install slackernews-gnu:

http://10.0.0.11:30000
-----------------------------------------------------------------
At this point, the cluster is provisioned and the Admin Console is deployed, but the application is not yet installed.
-
Do one of the following to access the Admin Console:
- If you brought your own VM, go to the URL provided in the output of the install command.
note
The IP address in the provided URL might be the private IP address of your VM. You might need to edit the URL to use the public IP address.
- If you created the VM with Compatibility Matrix:
-
In the Vendor Portal, go to Compatibility Matrix.
-
Open the dot menu for your VM and click Edit VM.
-
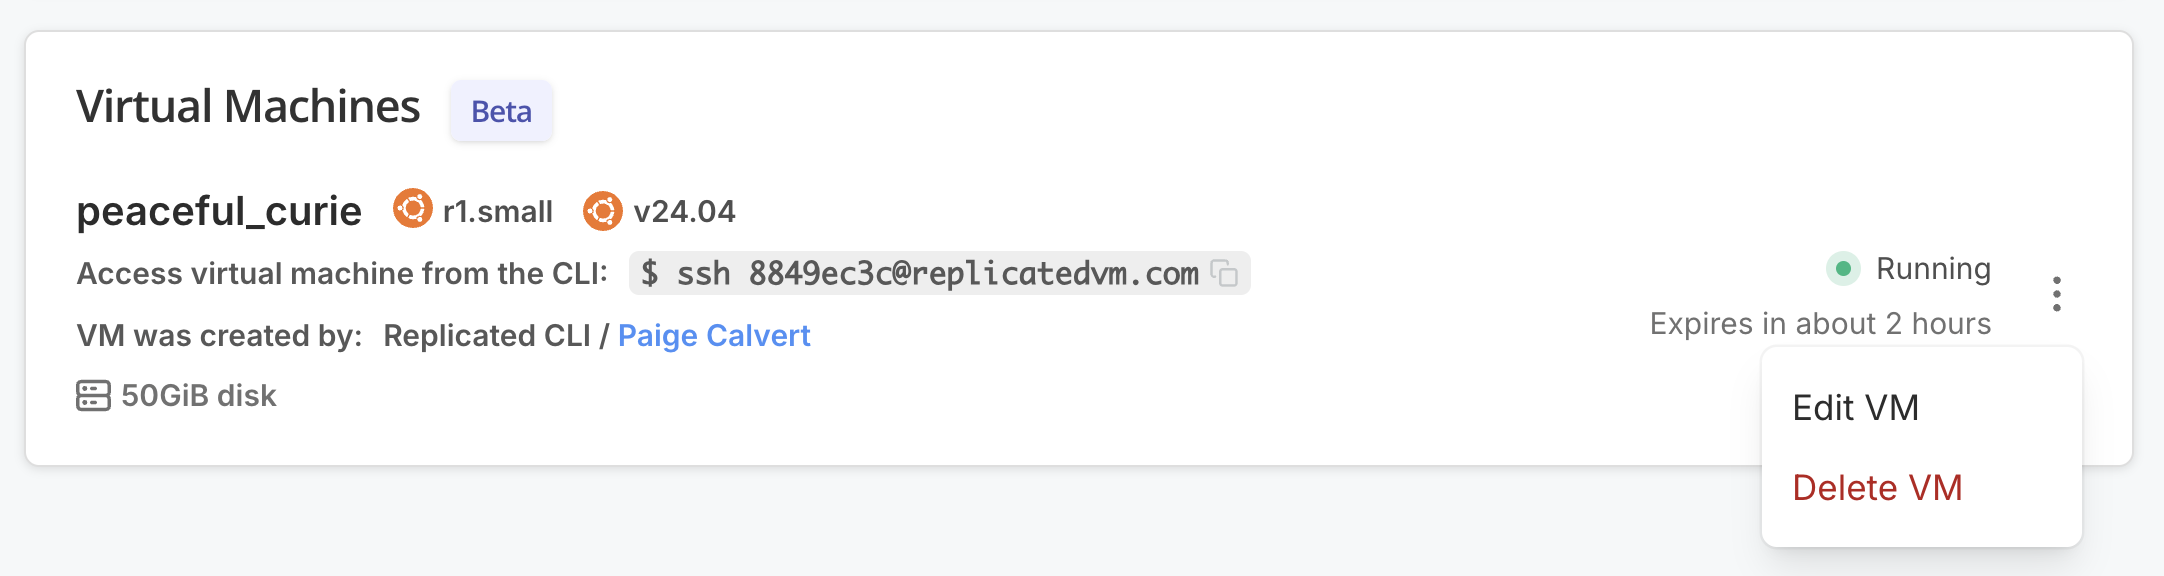
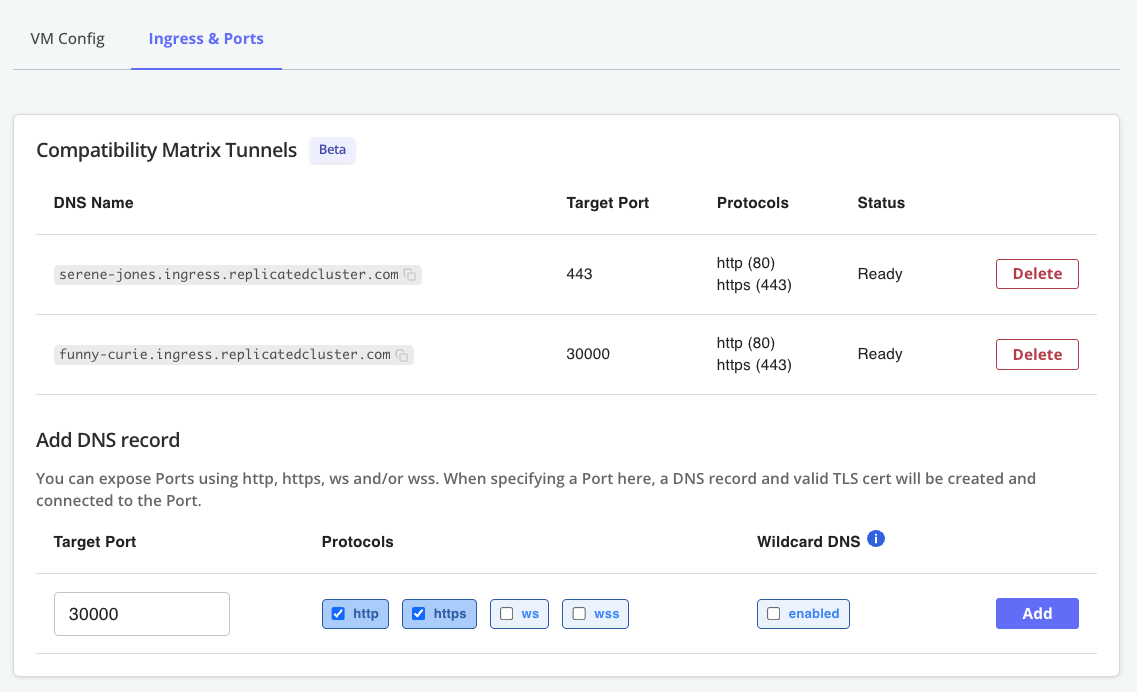
Under Ingress & Ports, for Add DNS record, click Add to create a DNS record using the default settings. This will provide a hostname where you can access the Admin Console.
-
Add another DNS record with a Target Port of 443. This will provide a hostname where you can access SlackerNews after it's installed.
The following shows an example of both of these DNS records added to a VM:
-
(Optional) Copy the URL for the DNS record with a target port of 443 and save it somewhere on your local machine. You will be asked to provide this hostname in the Admin Console as part of the installation process for SlackerNews.
-
In a browser, navigate to the URL for the DNS record with a target port of 30000.
The Admin Console opens.
-
- If you brought your own VM, go to the URL provided in the output of the install command.
-
If you are directed to the Admin Console landing page:
- Click Start.
- On the Secure the Admin Console screen, review the instructions and click Continue. In your browser, follow the instructions that were provided on the Secure the Admin Console screen to bypass the warning.
- On the Certificate type screen, either select Self-signed to continue using the self-signed Admin Console certificate or click Upload your own to upload your own private key and certificate. By default, a self-signed TLS certificate is used to secure communication between your browser and the Admin Console. You will see a warning in your browser every time you access the Admin Console unless you upload your own certificate.
noteIf you created the VM with Compatibility Matrix, you might not see these pages. Instead, your browser might automatically redirect to the Admin Console login screen.
-
On the login screen, enter the Admin Console password that you set and click Log in.
-
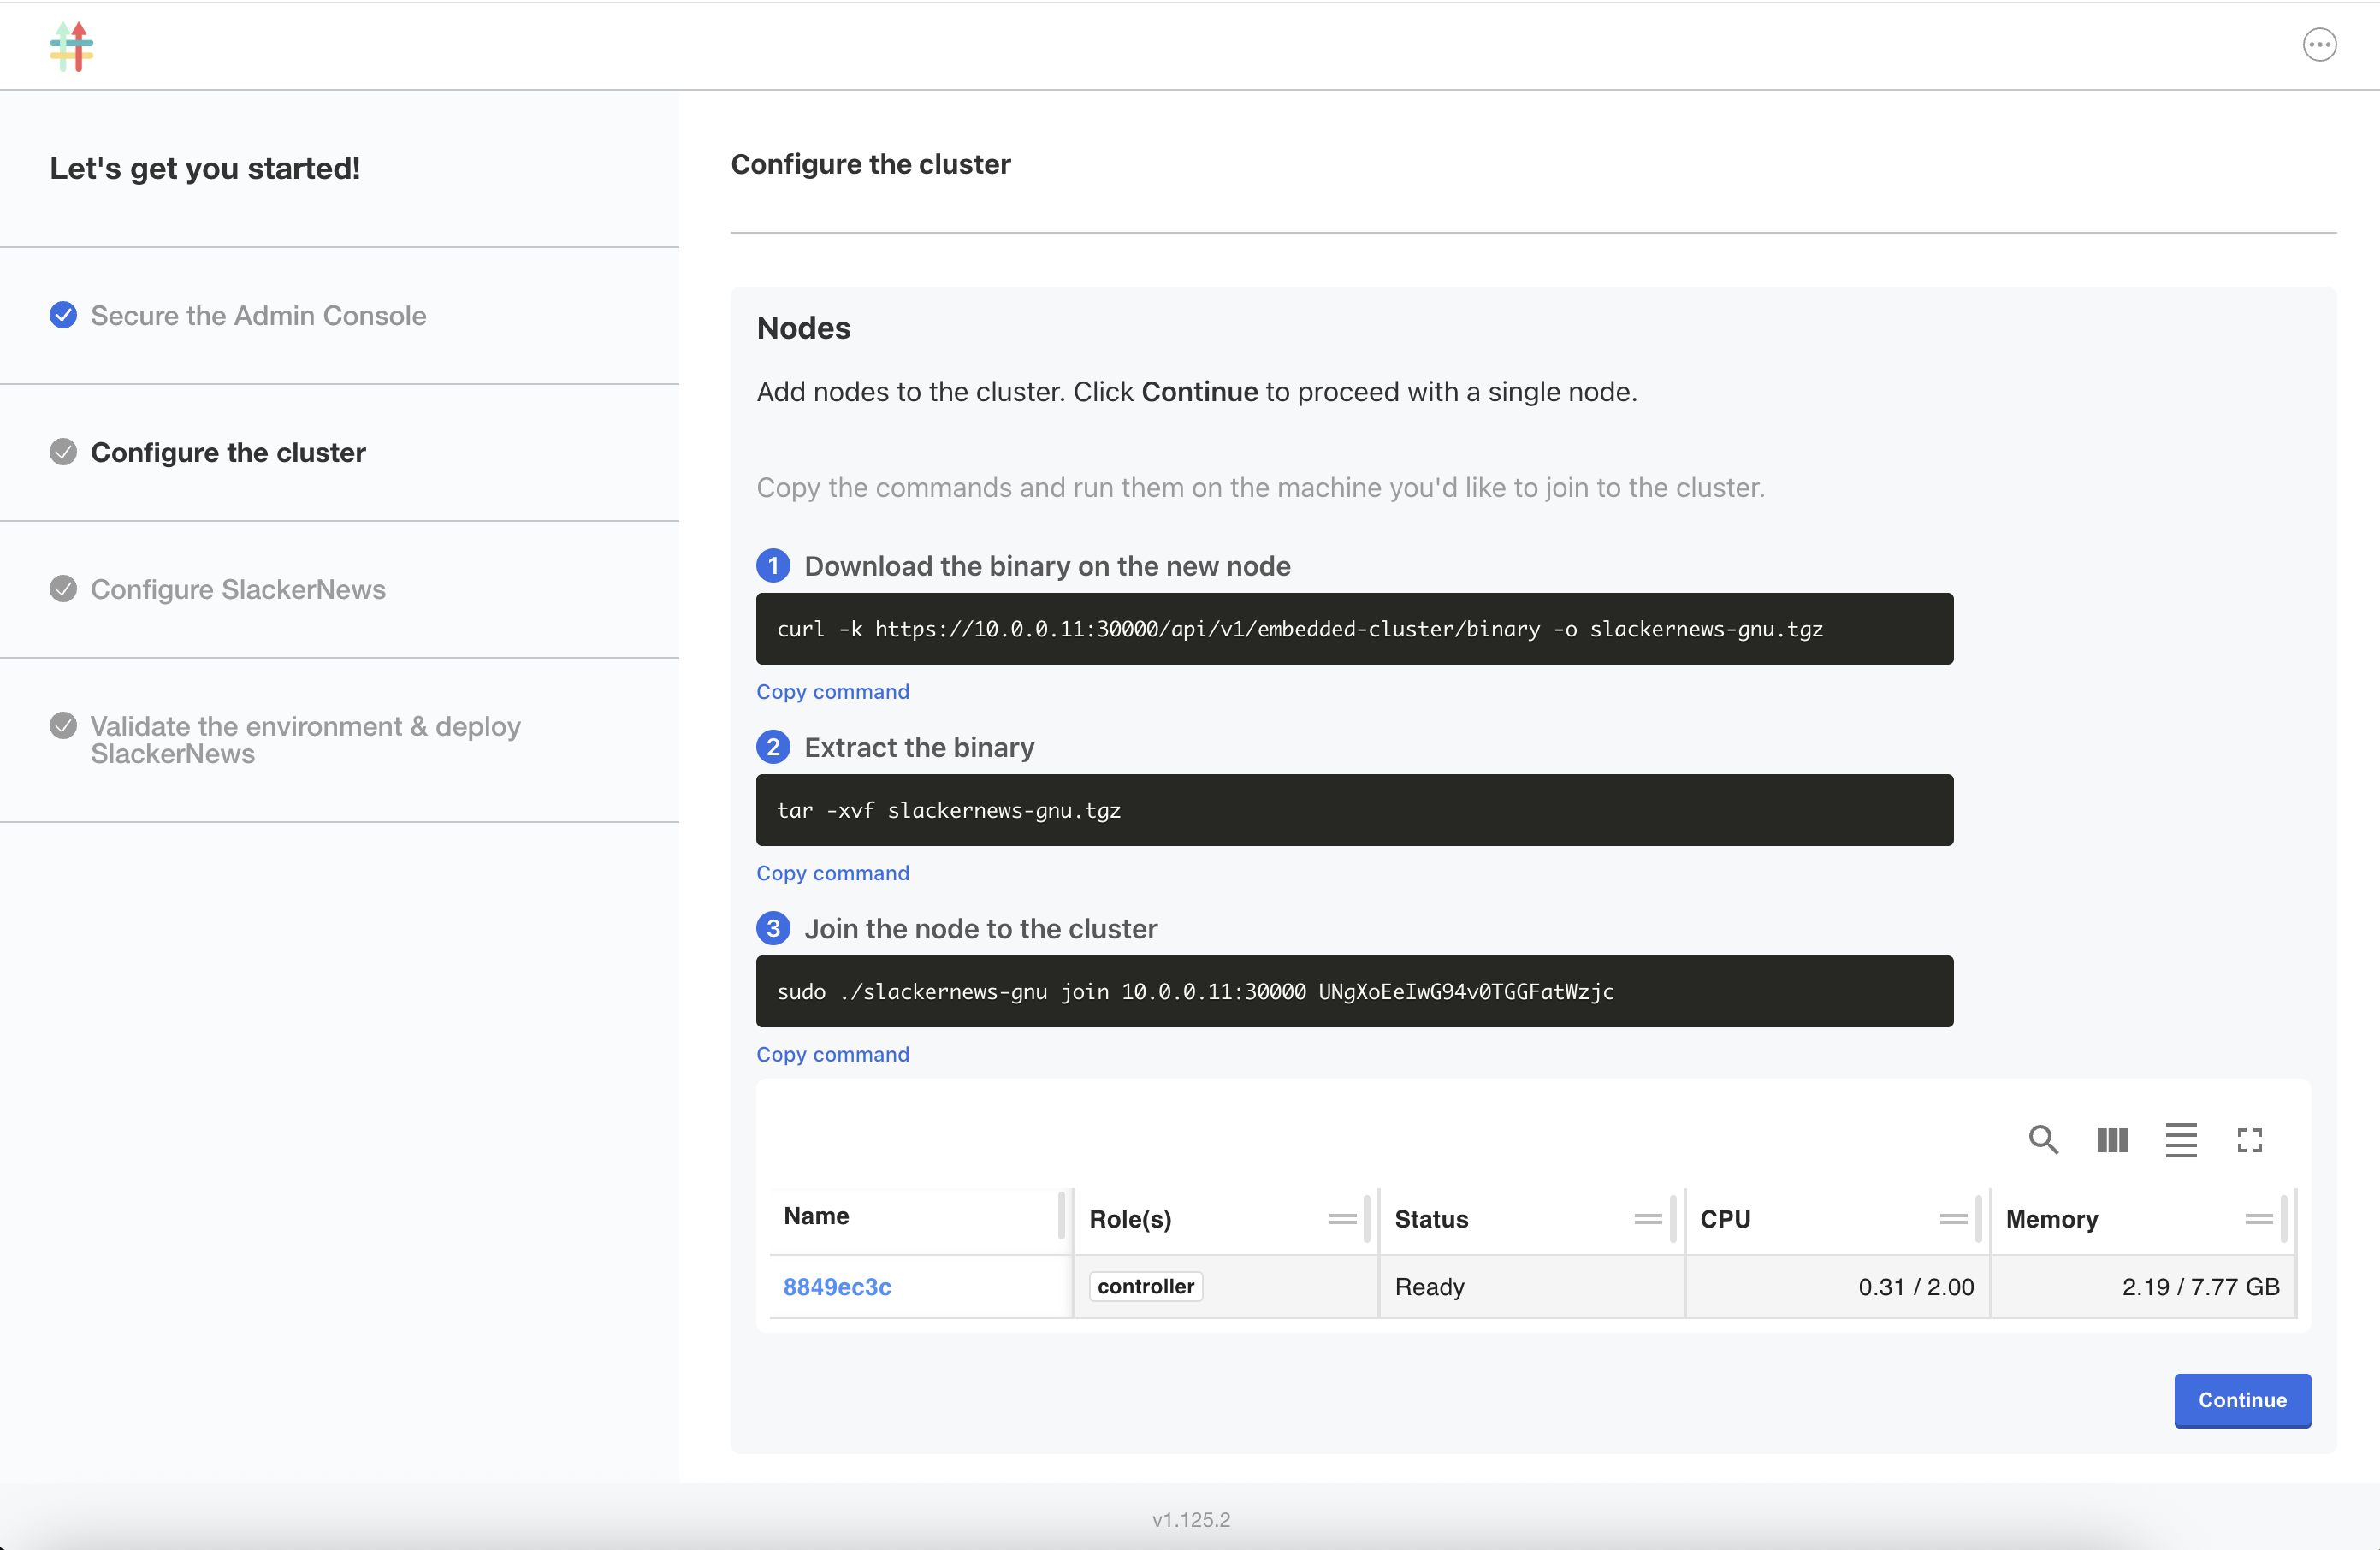
On the Configure the cluster screen, you can view details about the VM where you installed, including its node role, status, CPU, and memory. Users can also optionally add additional nodes on this page before deploying the application. Click Continue.
-
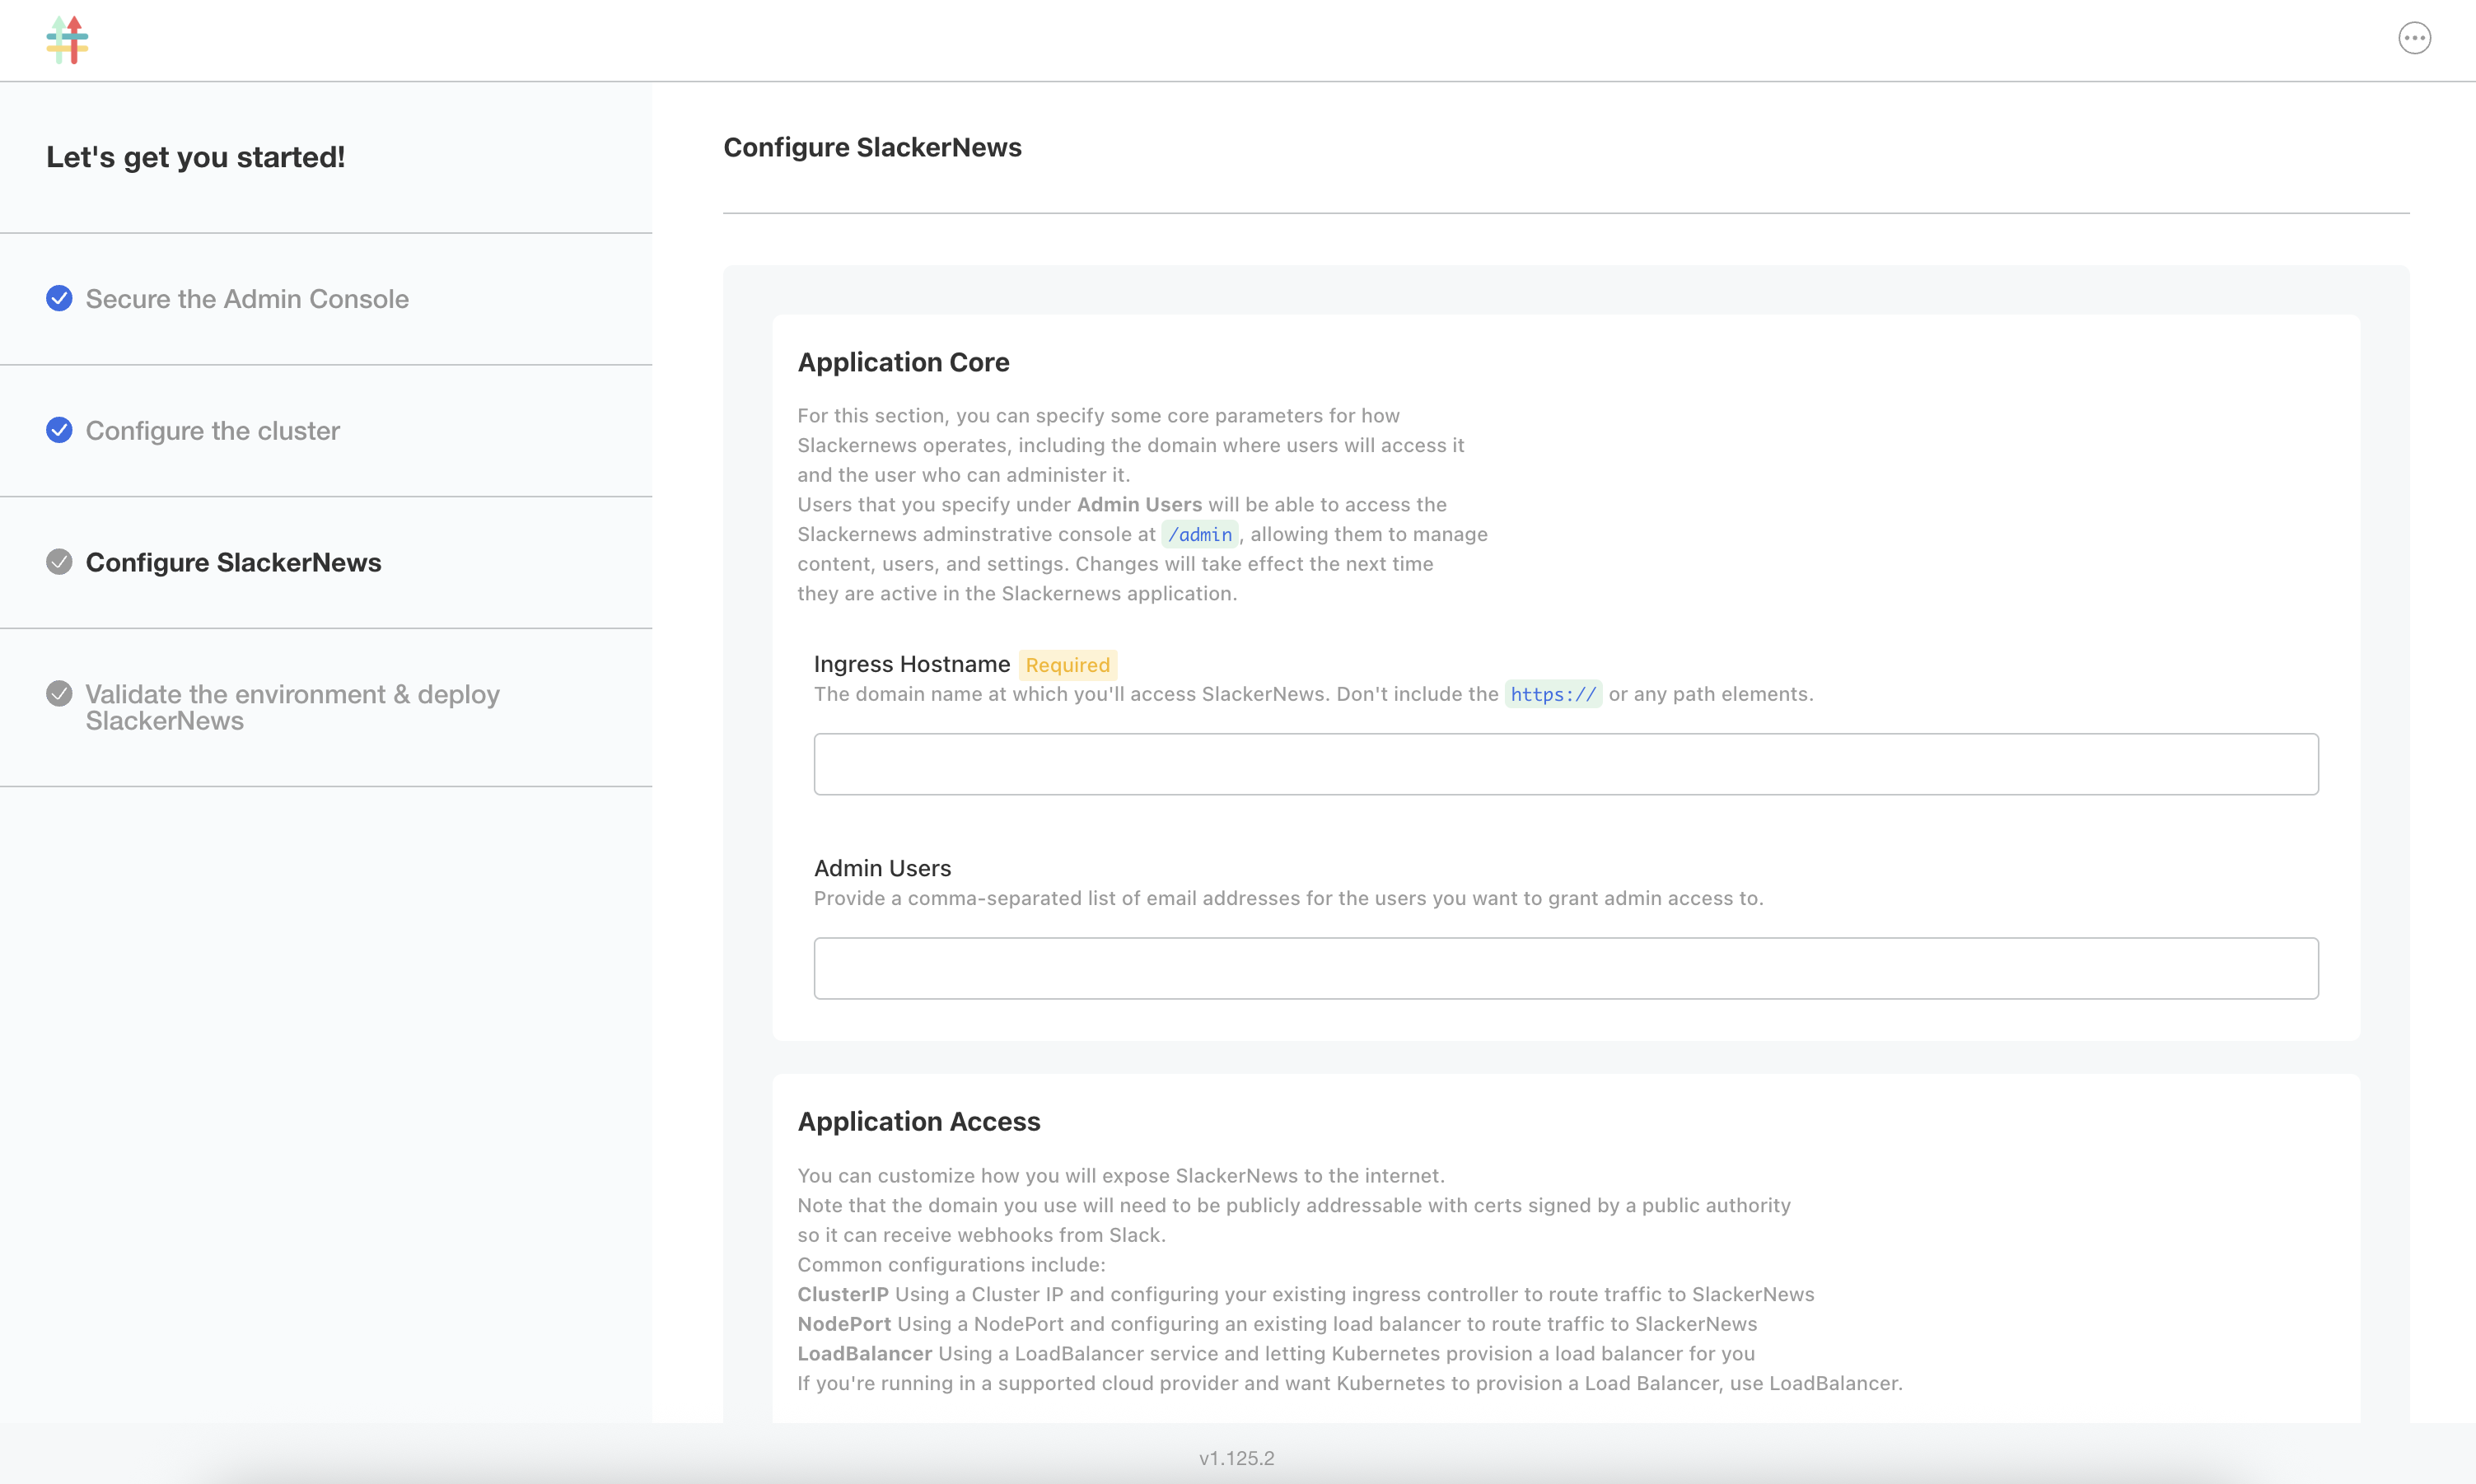
On the Configure SlackerNews screen, complete the following fields:
-
For Ingress Hostname:
-
If you created the VM with Compatibility Matrix, enter the URL that you copied for the DNS record with a target port of 443. For example,
pensive-keldysh.ingress.replicatedcluster.com. -
If you are using your own VM, provide the public IP address for your VM. You can copy the IP address from your browser's address bar where you are currently accessing the Admin Console. Alternatively, if you have a hostname for your VM's IP address, you can provide that instead.
-
-
For Application Access > Service Type, ensure that NodePort is selected. Leave the Node Port field blank to use the default port of 443.
-
For Postgresql, ensure that Deploy Postgresql Database is enabled to deploy the built-in Postgresql database.
Leave the other fields on the Configure SlackerNews screen empty. They are not applicable for this quick start.
-
-
Click Continue.
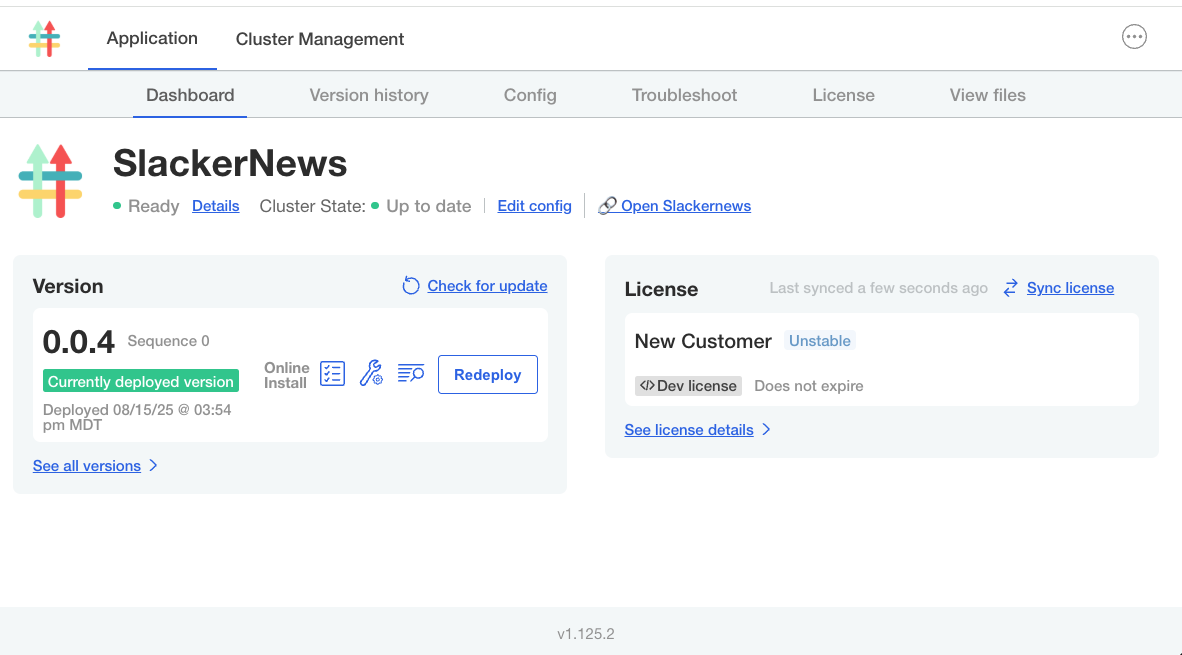
The Admin Console dashboard opens. The application status changes from Missing to Unavailable while the application is being deployed. You can click Details next to the status for more information about the status of specific application resources.
After a few minutes, the status changes to Ready when the application is deployed:
-
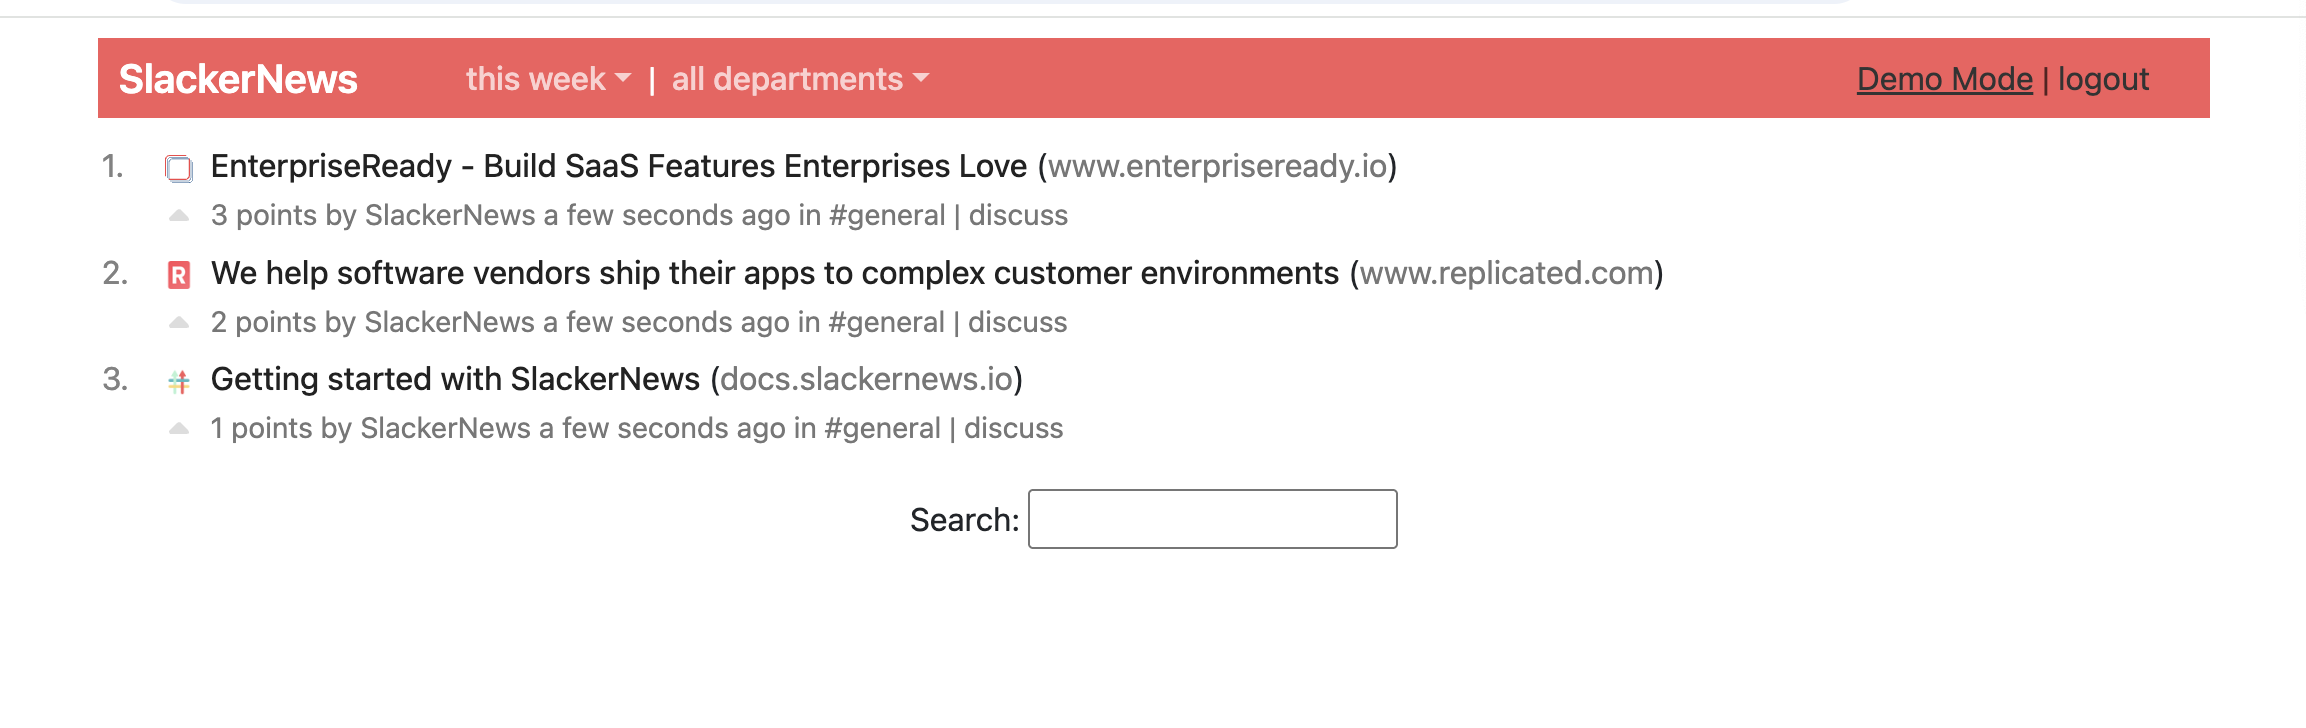
After a few minutes when the application status is Ready, click Open SlackerNews to view SlackerNews in a browser.
-
-
View telemetry for the instance that you just deployed:
-
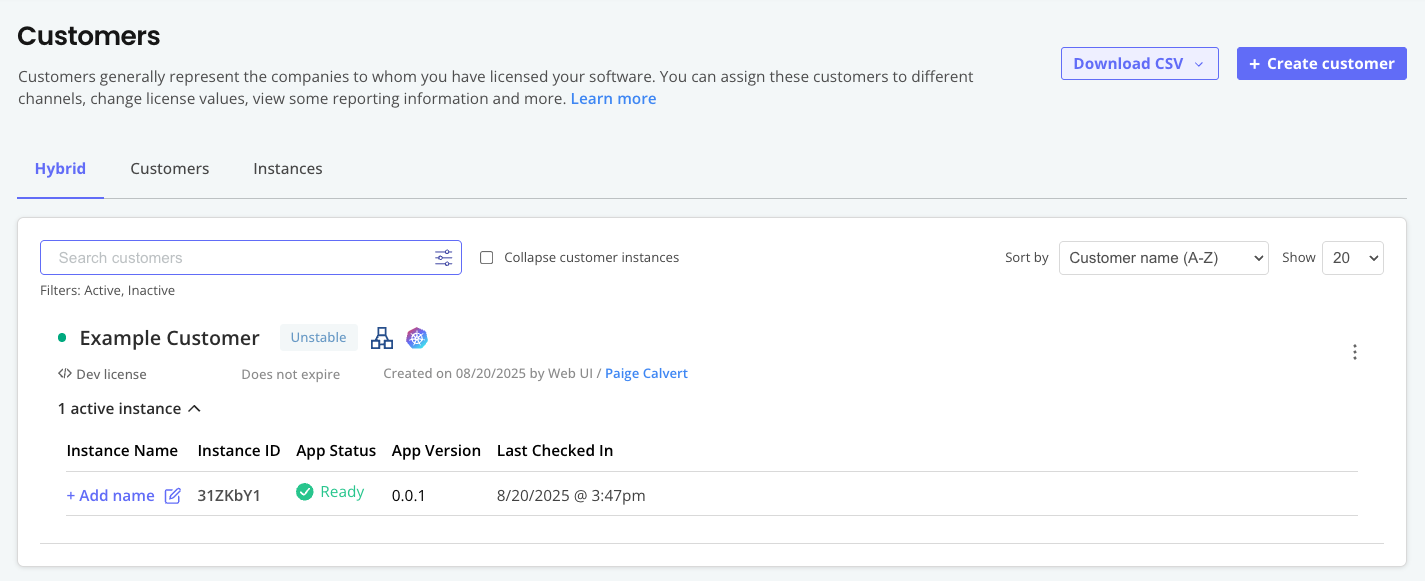
Return to the Vendor Portal, select the SlackerNews application, and go to Customers. Under the name of the customer, confirm that you can see an active instance.
View a larger version of this image
This instance telemetry is automatically collected and sent back to the Vendor Portal by Embedded Cluster and the Replicated SDK. For more information, see About Instance and Event Data.
-
(Optional) Under Instance ID, click on the ID to view additional insights including the versions of Kubernetes and the Replicated SDK running in the cluster where you installed the application.
-
-
Create a new release that adds preflight checks to the application:
-
In your local filesystem, go to the
quick-start/chart/slackernewsdirectory. -
Create a
preflights.yamlfile in thetemplatesdirectory for the chart:touch templates/preflights.yaml -
In the
preflights.yamlfile, add the following YAML to create a Kubernetes Secret with a simple preflight spec:apiVersion: v1
kind: Secret
metadata:
name: slackernews-preflight
labels:
troubleshoot.sh/kind: preflight
stringData:
preflight.yaml: |-
apiVersion: troubleshoot.sh/v1beta2
kind: Preflight
metadata:
name: slackernews-preflight
spec:
collectors:
- clusterInfo: {}
- clusterResources: {}
- http:
collectorName: slack
get:
url: https://api.slack.com/methods/api.test
timeout: 20s
analyzers:
# verify that slack is accessible
- textAnalyze:
checkName: Slack Accessible
fileName: slack.json
regex: '"status": 200,'
outcomes:
- pass:
when: "true"
message: "Can access the Slack API"
- fail:
when: "false"
message: "Cannot access the Slack API. Check that the server can reach the internet and check [status.slack.com](https://status.slack.com)."The YAML above defines a preflight check that confirms that an HTTP request to the Slack API at
https://api.slack.com/methods/api.testmade from the cluster returns a successful response of"status": 200,. -
In the
Chart.yamlfile, increment the version to 1.0.1:# Chart.yaml
version: 1.0.1 -
Update dependencies and package the chart to a
.tgzchart archive:helm package --dependency-update . -
Move the
slackernews-1.0.1.tgzchart archive to themanifestsdirectory:mv slackernews-1.0.1.tgz ../../manifests -
Change to the
manifestsdirectory. -
In the
manifestsdirectory, open the HelmChart custom resource (slackernews.yaml) and update thechartVersionto match the new archive:# slackernews.yaml HelmChart
chartVersion: 1.0.1 -
Remove the unused chart archive for version 1.0.0 from the
manifestsdirectory:rm slackernews-1.0.0.tgz -
From the
manifestsdirectory, lint the release manifests:replicated release lint --yaml-dir .noteIf you see a
helm-archive-missingerror, confirm that you have only one chart archive inmanifestsfor version 1.0.1, and that thechartVersionin the HelmChart resource is also set to1.0.1. If you notice that any of the errors are from files in your.history/directory, runrm -rf .historyand then lint the files again. -
Create and promote a new release, setting the version label of the release to
0.0.2:replicated release create --yaml-dir . --promote Unstable --version 0.0.2Example output:
  • Reading manifests from . ✓
  • Creating Release ✓
    • SEQUENCE: 2
  • Promoting ✓
    • Channel 2kvjwEj4uBaCMoTigW5xty1iiw6 successfully set to release 2
-
-
On your VM, update the application instance to the new version that you just promoted:
-
In the Admin Console, go to the Version history tab.
The new version is displayed automatically.
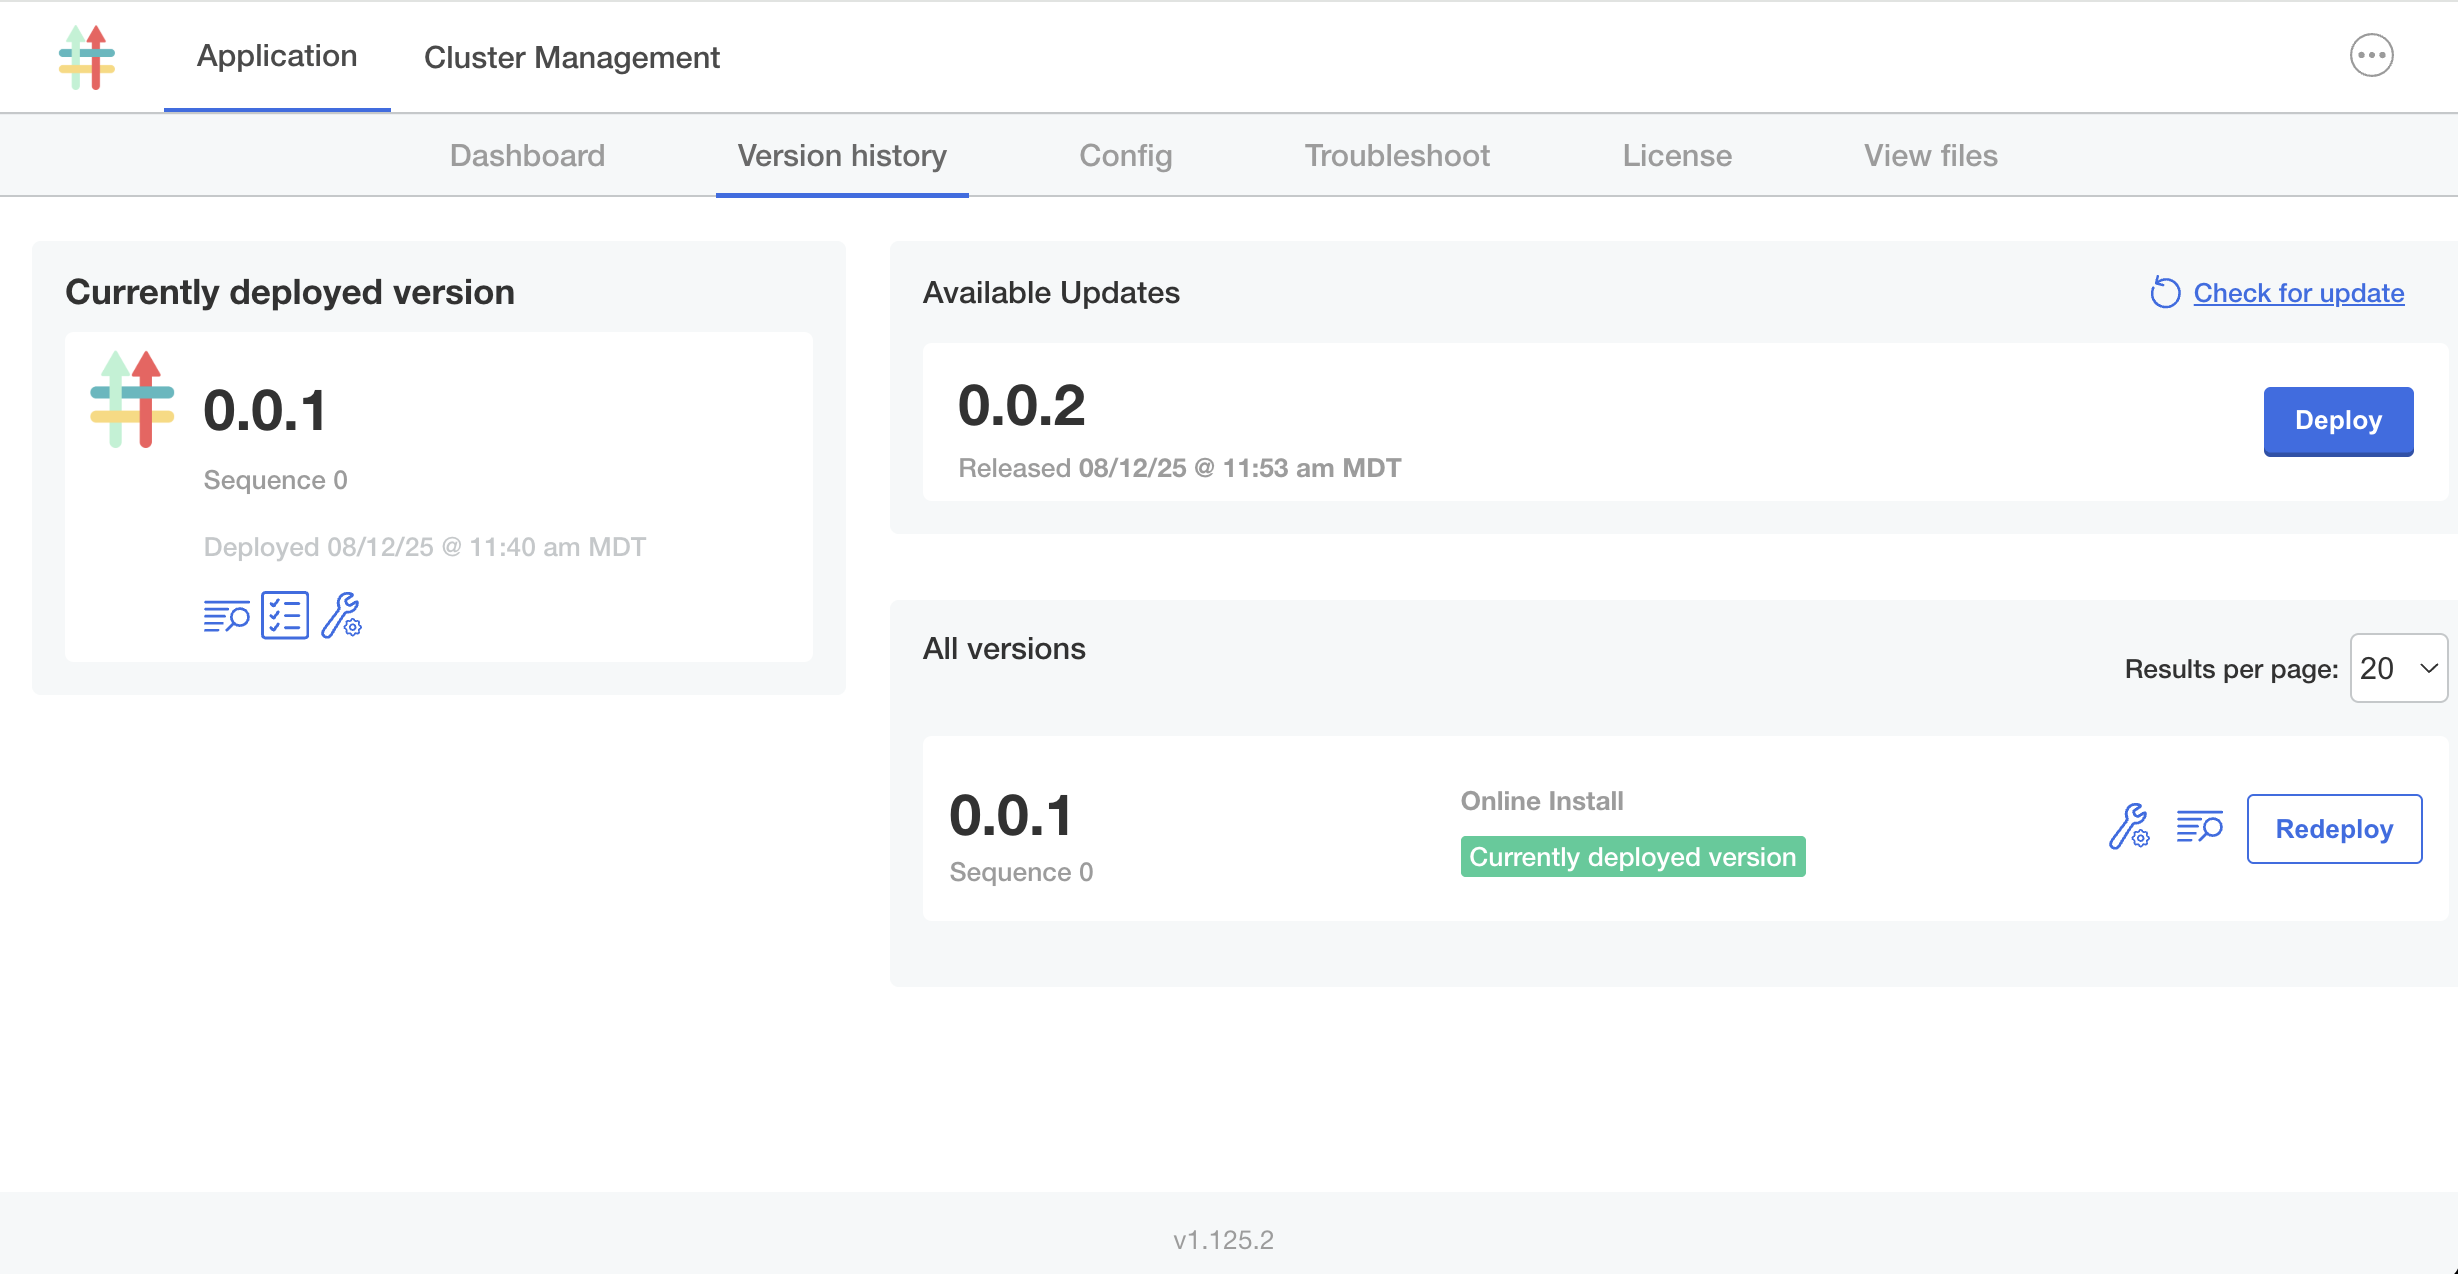
-
Click Deploy next to the new version.
The Embedded Cluster upgrade wizard opens. Follow the steps until you see the Preflight checks screen.
-
On the Preflight checks screen, note that the "Slack Accessible" preflight check that you added was successful. Click Next: Confirm and deploy.
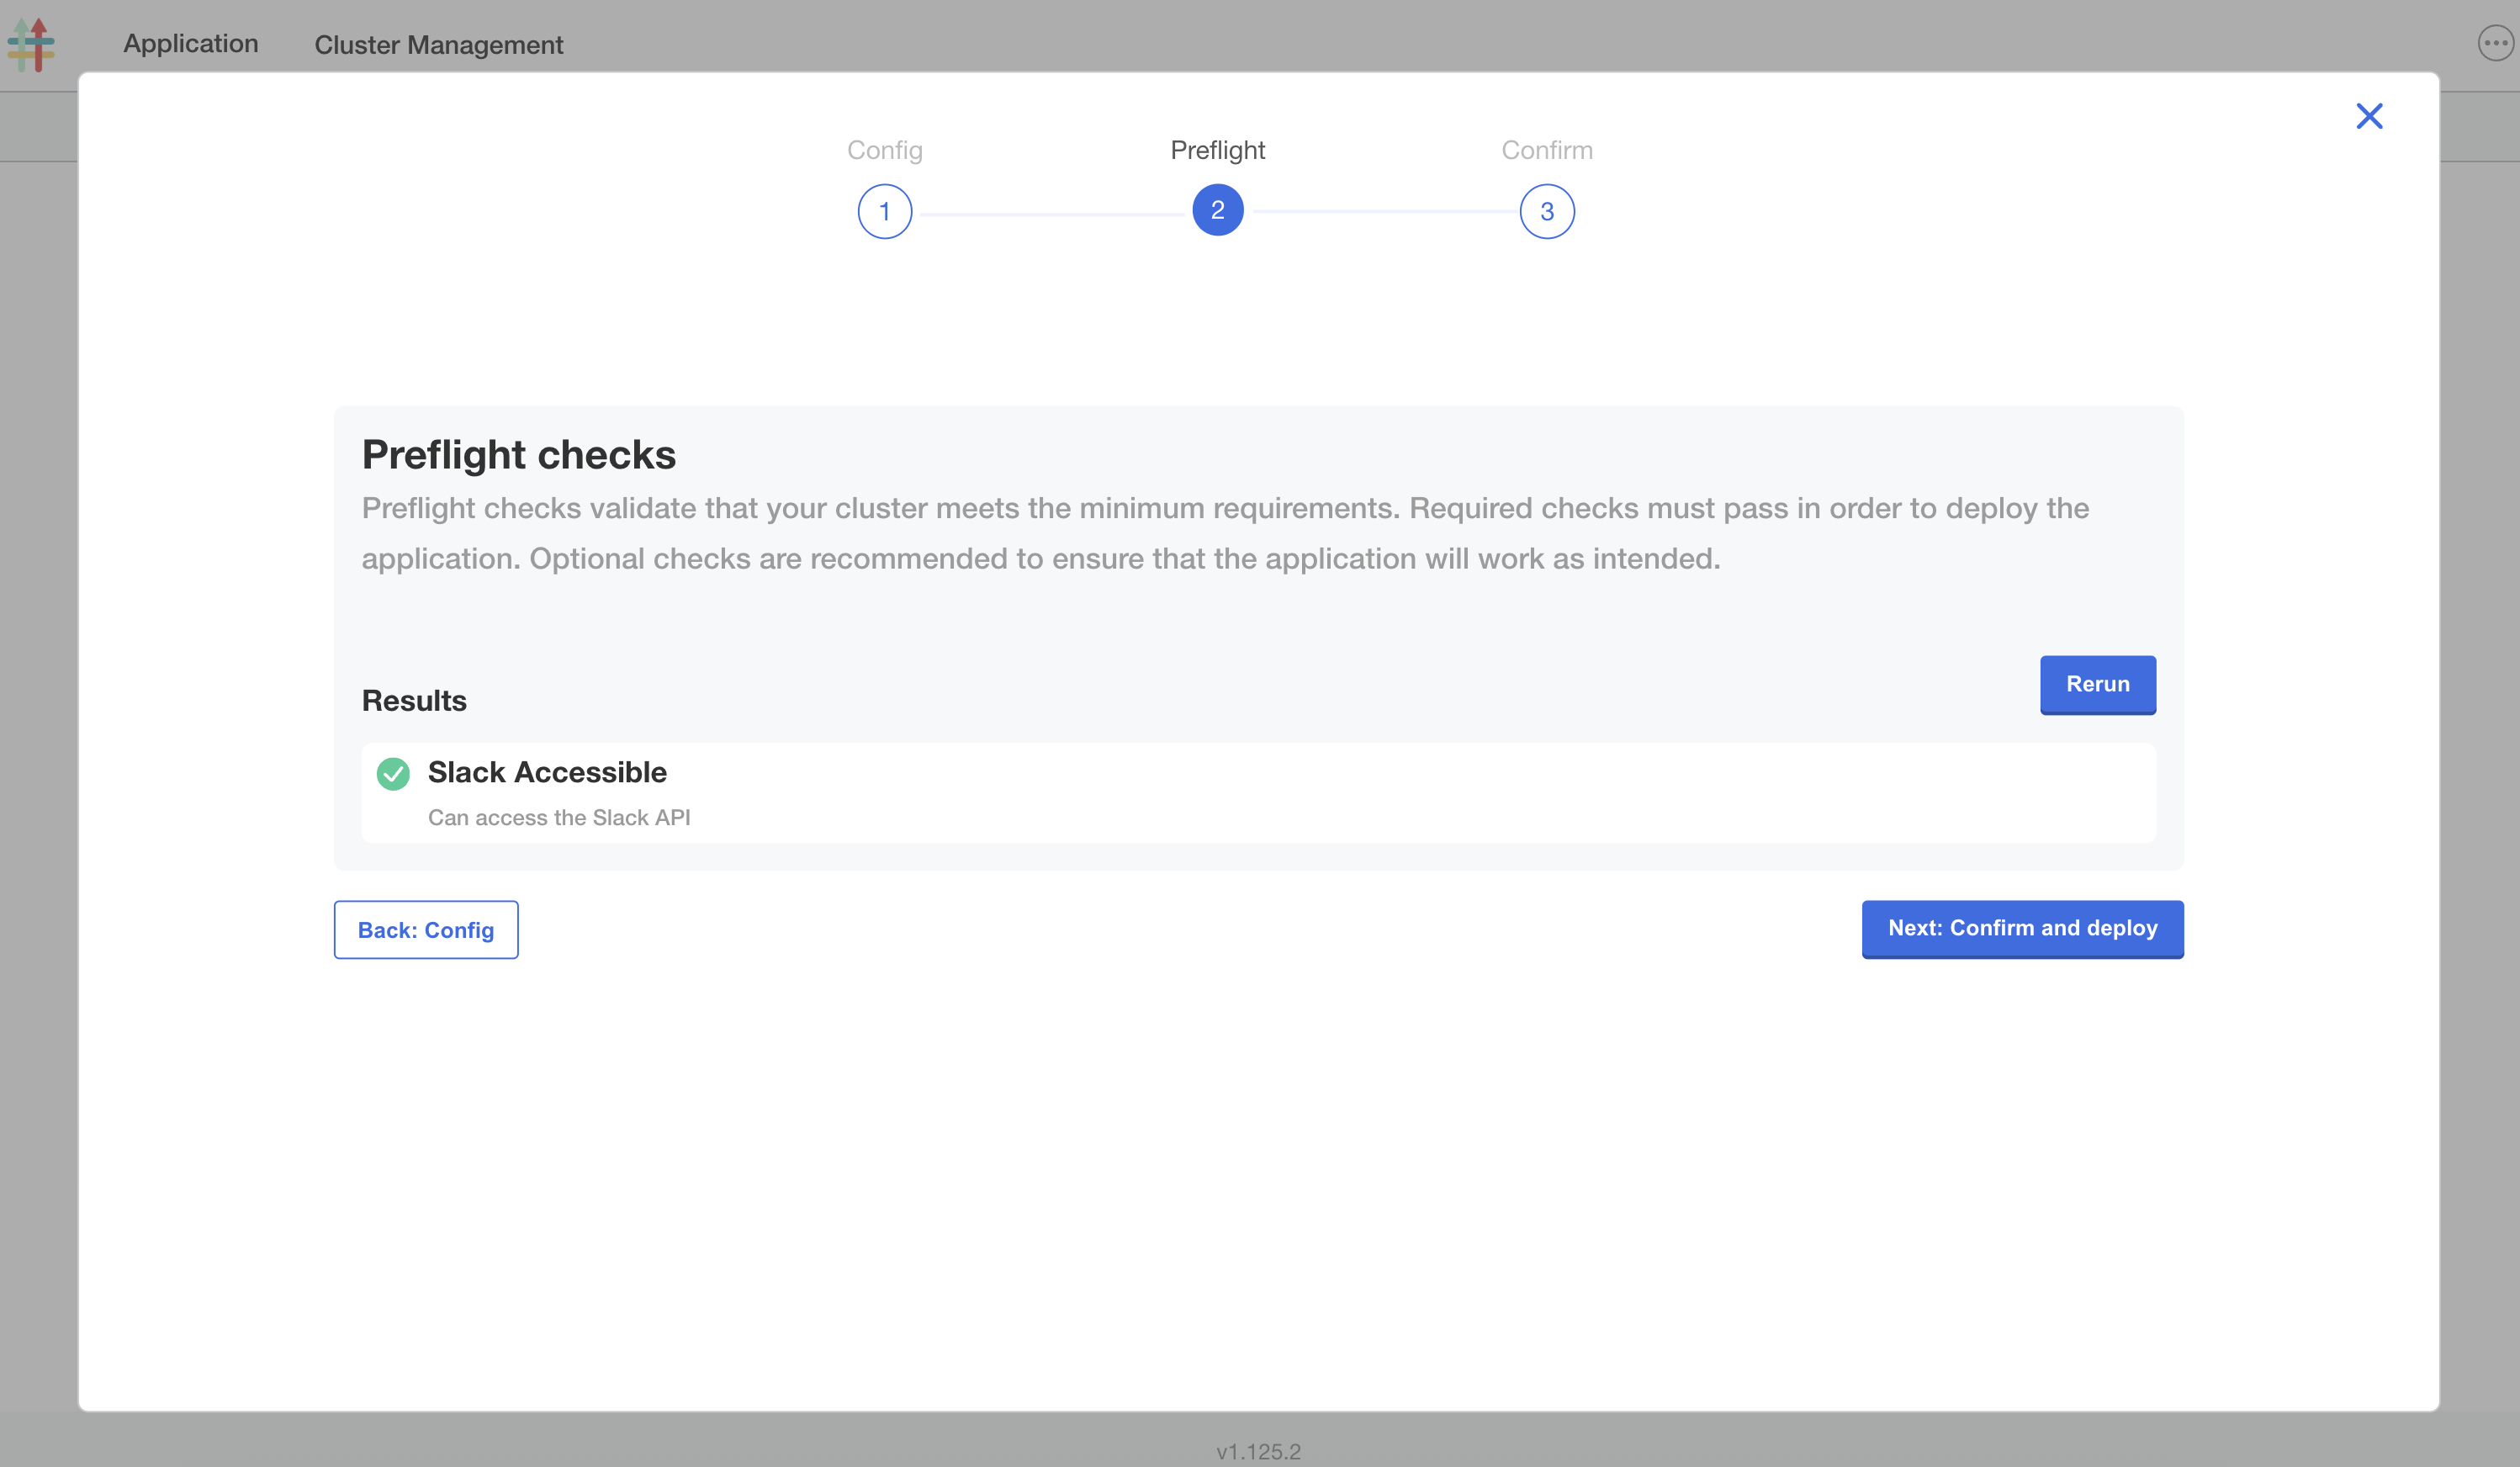
-
On the Confirm and Deploy page, click Deploy.
-
-
Clean up the installation:
-
If you created the VM with Compatibility Matrix, delete the VM:
replicated vm rm VM_IDWhere VM_ID is the ID of the VM. You can run
replicated vm lsto get the ID. -
If you brought your own VM, use Embedded Cluster to reset and reboot the VM to remove the installation:
sudo ./APP_SLUG resetWhere
APP_SLUGis the unique slug for the application.noteYou can find the application slug by running replicated app ls on your local machine.
-
Next Steps
Congratulations! As part of this quick start, you:
- Added the Replicated SDK to a Helm chart
- Created a release with the Helm chart
- Installed the release on a VM with Embedded Cluster
- Viewed telemetry for the installed instance in the Vendor Portal
- Created a new release to add preflight checks to the application
- Updated the application to the new version using Embedded Cluster
Now that you are familiar with the workflow of creating, installing, and updating releases, you can begin onboarding your own application to the Replicated Platform.
To get started, see Onboard to the Replicated Platform.
Related Topics
For more information about the Replicated Platform features mentioned in this quick start, see: